
So, we don’t have bees yet. Let’s just get that out of the way right now so we can proceed to not talk about it anymore. I’ll just say this: 2017 IS going to be the year of the bees. It has to be. Otherwise I’m going to be stuck with a lovely, expensive piece of bee furniture in my living room forever and a blog with a name that has absolutely no relation to its content. Like those songs where you can’t remember the title because it has nothing whatsoever to do with the lyrics so you go around calling it Teenage Wasteland because, seriously? Baba O’Riley?? Or Bullet With Butterfly Wings? Yeah, okay, Billy…fortunately for you, really killer songs can get away with that kind of nonsense.
But anyway, no bees. Yet. Moving on.
I thought this post could be about how projects that sit around my house for years do actually sometimes get done. One just did. It involves a big branch that fell off of one of the birch trees out back. I found it shortly after we moved in…2013ish. There was something compelling about it. The coloring variations, the curved shape, the size, the negative space. Just a really great branch in every way. So naturally, I squirreled it away in the garage and forbade anyone (Dana) to touch it until I could figure out what to do with it. Something definitely had to be done with it. Initial concepts ranged from cat furniture to a supplementary clothing rack. But I wanted it someplace where I could look at it and it wouldn’t get ruined. I decided to make it into a curtain rod. That was, oh, a couple of years ago.
Early on in the creative process (also known as “storage”) it became necessary for me to rescue the branch on more than one occasion from complete annihilation by bonfire at the hands of my purge-happy husband and his friends/accomplices. I would, through sheer good luck, happen to spot it in the fire pit, demand explanations (explanation: “we think it’ll burn good”), and drag all seven scraggly feet of it back to the garage where it would be returned to its place on the vacant kayak rack–another item Dana is itching to get rid of.
There it safely stayed for a long time until a couple of weeks ago when, in an early-onset bout of spring fever, I got motivated to bring this project to the next step. Now, this might get boring for anyone who is not personally invested in helping fallen branches to realize their potential as curtain rods. Because that’s what I’m going to discuss here, at length. The aesthetics of branch-as-curtain rod, how to get from branch to curtain rod, the pros and cons of hanging curtains on a branch, and so on. So if you are tuning out or drifting off, it’s okay. You have my permission to leave and check out what’s going on over at Bread Face Blog or maybe watch some of the videos where they cook the tiny food. I understand.
But. If you’ve ever looked at a branch and thought, “THAT should be a window treatment,” read on. I will take you on my journey.
The first thing I did was pick out curtains. I wanted tab tops–casual and breezy but not with ties that would have lots of superfluous strings. I started (and ended) at the Urban Outfitters website, since I’ve been obsessed with their curtains for a while now. As luck would have it, the curtains were all on sale (still are as of this writing) and so I advised them to take my money immediately and send me four panels of the Tamara, which they did.
Next, I had to strategize. I’d been looking at photos on Google images, Houzz, and of course Pinterest, and seen enough to know what I wanted and what I wanted to avoid. I knew I did not want to run the actual branch through the curtain, which virtually all of the examples showed. I wanted the curtain to slide open and closed smoothly and easily. I also knew I wanted to minimize the look of hardware or supports, so no big brackets.
The solution I came up with was to string a hanging cord across the branch, like a bow. For support, I opted to hang it from the ceiling with hooks rather than resting it on brackets at all.
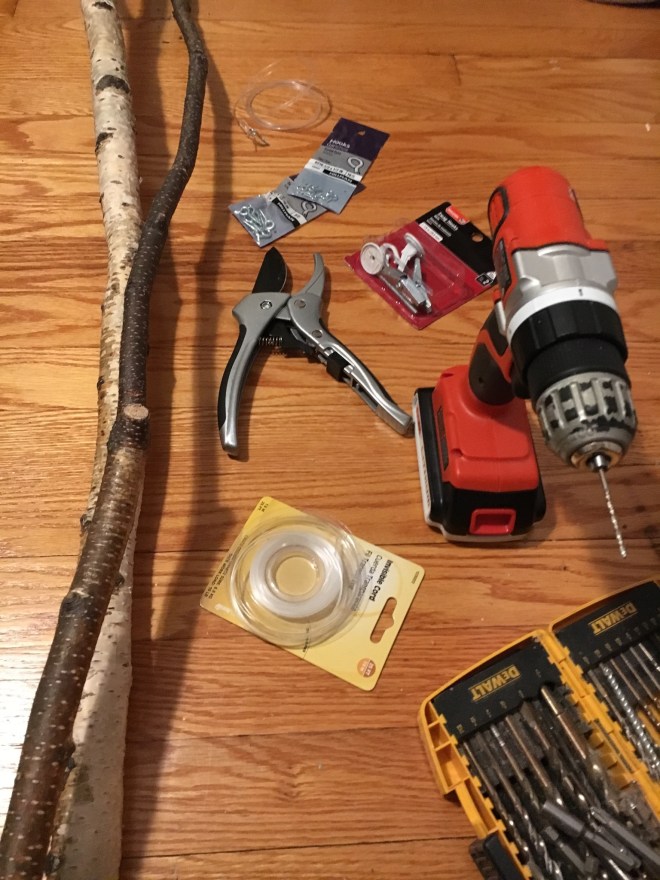
The supply list is short and sweet:
A branch – It should be sturdy enough to be able to drill small holes in. The one I used is about 2″ diameter at the widest end down to about 1 1/2″ and curves slightly. It should be long enough to extend at least a few inches past the window frame on either side. Mine is a full foot past the window frame on each side.
Electric drill & bits
Measuring tape and pencil
Safety glasses
Scissors or clippers for cutting the hanging cord
Ceiling/swag hooks – I used 2 for one window
Hanging cord – Nice because it is strong, stiff, not very visible, and doesn’t stretch out of shape. Tying knots in the cord is possible (contrary to many impassioned online reviews I read about the stuff) but, I’m not going to lie, it’s no picnic.
Hooks – a couple of different sizes, as small as possible. I ended up using a total of 4.
This was my process:
1) Trimmed the branch to size and to get any broken twigs and splintered ends off of it, and held it up to see how it would look when placed.
2) Used the measuring tape and pencil to measure and mark the placement of the ceiling hooks. I wasn’t too precious about that part. I’m not a great measurer. It’s not that I don’t believe in “measure twice, cut once,” it’s just I’m not patient enough for it. I’m like, “Measure tw–oh, hell!” *snip!* …But in this case it worked out.
3) Installed the hooks according to the package instructions (I am skipping all of the awkwardness and discomfort and raining down of dust that this entailed)
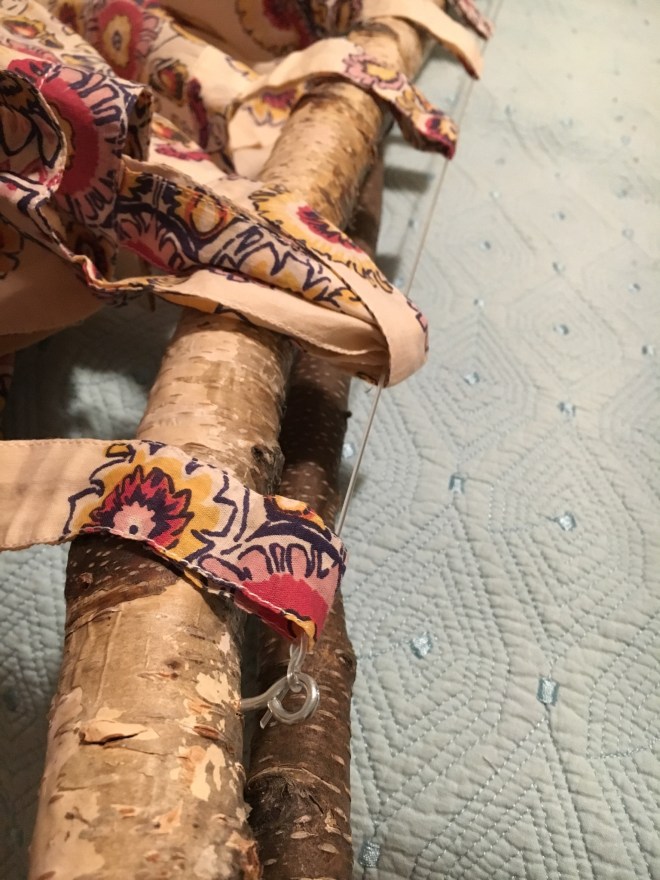
4) Held a length of hanging cord against the branch to plan where it would have to be attached, taking into account the curve of the branch. I was fortunately able to find attachment points that would allow a long enough track for the curtains to slide on without brushing against any parts of the branch.
5) Held the branch to the window again to make sure the curtains would be able to be opened wide enough. Marked on the branch the points where the little non-ceiling hooks would go–both to attach the cord for the curtain on the side closest to the window (on the inside of the curve) and the two loops of cord that would be attached to the top side of the branch to enable it to hang from the ceiling hooks
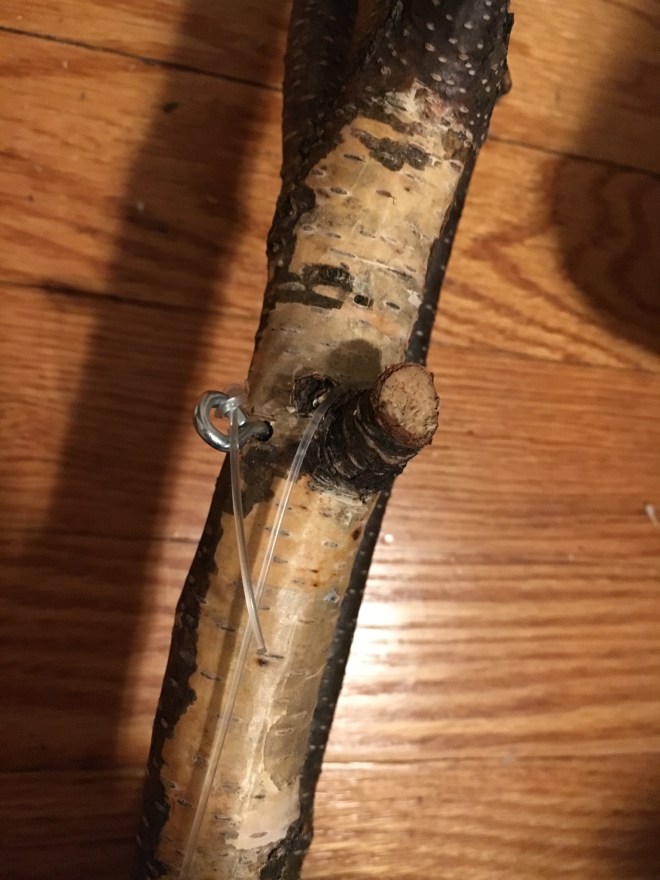
6) Made my 2 loops for hanging the branch by running a short length of cord through each of the 2 hooks and knotting it. Again: knotting the hanging cord? Sucks. But it can be done, and if the knot isn’t as tight as you want it to be, it’s ok because once the branch is hung, there will be tension on it which should keep it from loosening. I ended up with 2 of these:
7) Drilled the pilot holes for the hooks that would hold the loops for hanging the branch and screwed the hooks (with those there loops I just made) into the top side of the branch.
8) Hung the branch without the curtain just to make sure it looked balanced. By some miracle, it did. I did some slight adjusting of the loops by moving the knots around in order to raise the branch a little higher.
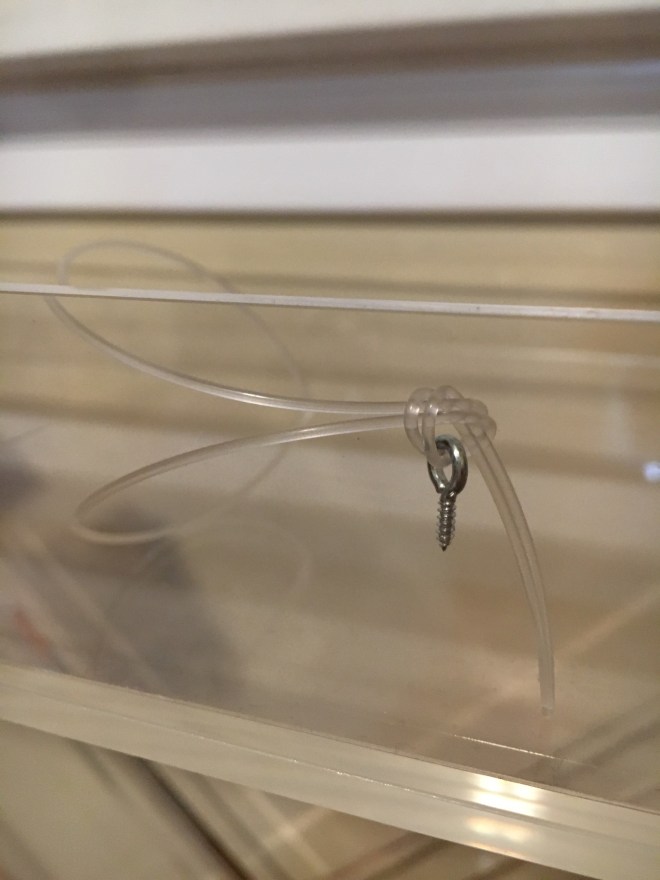
9) Took the branch back down and attached a very long length of hanging cord to another hook for the curtain track. This is where I had to improvise heavily. I knew I would have to attach one side of the cord to the branch with one hook, then run both curtain panels onto the cord before attaching the other end with the other hook. Attaching the first hook was easy: I just pilot drilled and screwed it in the same as the others. Running the cord through the curtain–also super easy.
What I didn’t count on was the absolute refusal of the hanging cord to twist enough to allow me to screw the other hook into the branch. It was just not going to happen. So instead of screwing it in, I pulled it as tight as I could, wrapped it around the branch once, taking advantage of a well placed little twig nub to keep it from sliding around, and drilled a hole just big enough and in just the right spot to be able to slide (instead of screw) the threaded part of the hook into the hole. Here’s what that looked like:
Because of how tightly the cord was pulled and the angle of the hole, the tension held the hook in the hole just fine. Whew! Now more than ever I am convinced that this particular branch was destined for this project. It literally could not have been more perfect.
10) Hung the branch in its final position and basked in the glow of my one completed project.

Here it is finished, and the curtain slides open and closed like buttah! In case you’re wondering, even though the branch is hanging, there is not a whole lot of swinging around. This is because of how short the loops are that are holding the branch, and because the ceiling hooks are just slightly farther apart than the hooks on the branch are–which was, to be honest, not actually intentional but seems to help stabilize it. Also, when opening and closing the panels, you are pulling in opposite directions so it stays balanced.

